How to set up a church projector for live streaming, step by step
TL;DR
– Single laptop running Scripture Live + OBS handles in-room projector AND YouTube/Facebook stream.
– HDMI for projector; browser source for streaming overlay; one operator can manage both.
– Total budget for a streaming-ready booth: GHS 8,000-12,000 with a Mac Mini or mini-PC.
Two weeks ago, the elders asked you to “handle the AV stuff.” You assumed that meant the in-room projector. Last Sunday, they added “and we want to start streaming the services on YouTube.” Now there’s a single Sunday between you and a working setup that has to do both: a projector showing scripture and lyrics for the people in the room, and a live broadcast that needs the same content overlaid cleanly on the camera feed.
Don’t panic. This is doable, the gear is cheaper than you’d think, and the workflow is well-trodden. This guide is how to set up a church projector for live streaming, step by step, in the order things should actually happen — from buying the right hardware to running a real Sunday.
We’ll keep it practical. By the end of this article you’ll have a working stack and a checklist you can run through before each service.
The two-output problem
The fundamental architectural choice you need to make on day one is this: how does your AV setup feed two surfaces at the same time?
- Surface 1: the in-room projector. Big screen, high contrast, simple typography. The congregation looks at it from twenty to fifty feet away.
- Surface 2: the live stream. A YouTube or Facebook broadcast. The viewer is looking at a camera feed of the pastor with scripture and lyrics overlaid on top.
These are two genuinely different outputs. The in-room projector wants full-screen verses and full-screen lyrics. The live stream wants verses and lyrics composited over the camera feed, often as a lower-third or as a full-screen scripture moment between camera shots.
A lot of churches try to solve this by pointing OBS at the projector window via screen capture. That technically works but it ties the broadcast to the same content the in-room projector is showing, which is rarely what you want. The right architecture is two independent outputs from the same source — and that’s what we’ll set up.
Cheap-and-good hardware shortlist
You don’t need expensive gear. A working setup can land under GHS 15,000 / USD $1,000 if you’re starting from zero, and a lot of churches already have most of what’s needed.
Display:
– HDMI projector (1080p minimum, 3000+ lumens for a typical sanctuary). BenQ, Epson, and ViewSonic all sell solid mid-range models in this range.
– Or a large 4K TV mounted at the front of the room. Surprisingly, a 65-inch TV is often a better choice than a projector for a church under 150 people — better contrast, no bulb costs, instant on. Trade-off is viewing angle from the sides.
Microphone:
– USB lavalier mic for the pastor. Movo, Rode, or Shure sell models in the GHS 500-1500 range. Wireless if budget allows.
– Or a dynamic vocal mic (Shure SM58 is the classic, GHS 700) on a stand for stationary preachers.
Audio interface:
– Focusrite Scarlett 2i2 or similar — converts XLR microphone output to USB so the streaming PC can hear it. Around GHS 1500. Necessary for any setup with non-USB mics.
Streaming PC:
– Mac Mini M2 or Windows mini-PC with a recent Intel/AMD chip and 16GB RAM. Around GHS 8000-12000. This runs OBS, Scripture Live, and your camera feeds simultaneously.
– An older laptop can work for a small church, but mini-PCs are quieter, more reliable, and better suited to permanent booth installation.
Camera:
– Logitech Brio or similar 4K webcam, USB. Around GHS 1500. Mounted at the back of the room pointed at the pastor.
– Or a real camcorder with HDMI out plus an HDMI-to-USB capture card (Elgato Cam Link 4K, around GHS 800). Better image quality, more setup work.
Cables and stands:
– HDMI cables long enough to run from the booth to the projector. Don’t cheap out on these — flaky HDMI is one of the most common failure modes.
– Mic cable, projector mount, camera tripod.
That stack covers the 80% case. A church that already has a projector and a USB mic just needs a streaming PC, an audio interface, and a camera to be ready.
The software stack
Two pieces of software, both free or with free tiers.
OBS Studio (free, open source). The streaming workhorse. Captures the camera feed, composites overlays, encodes the stream, sends it to YouTube or Facebook Live.
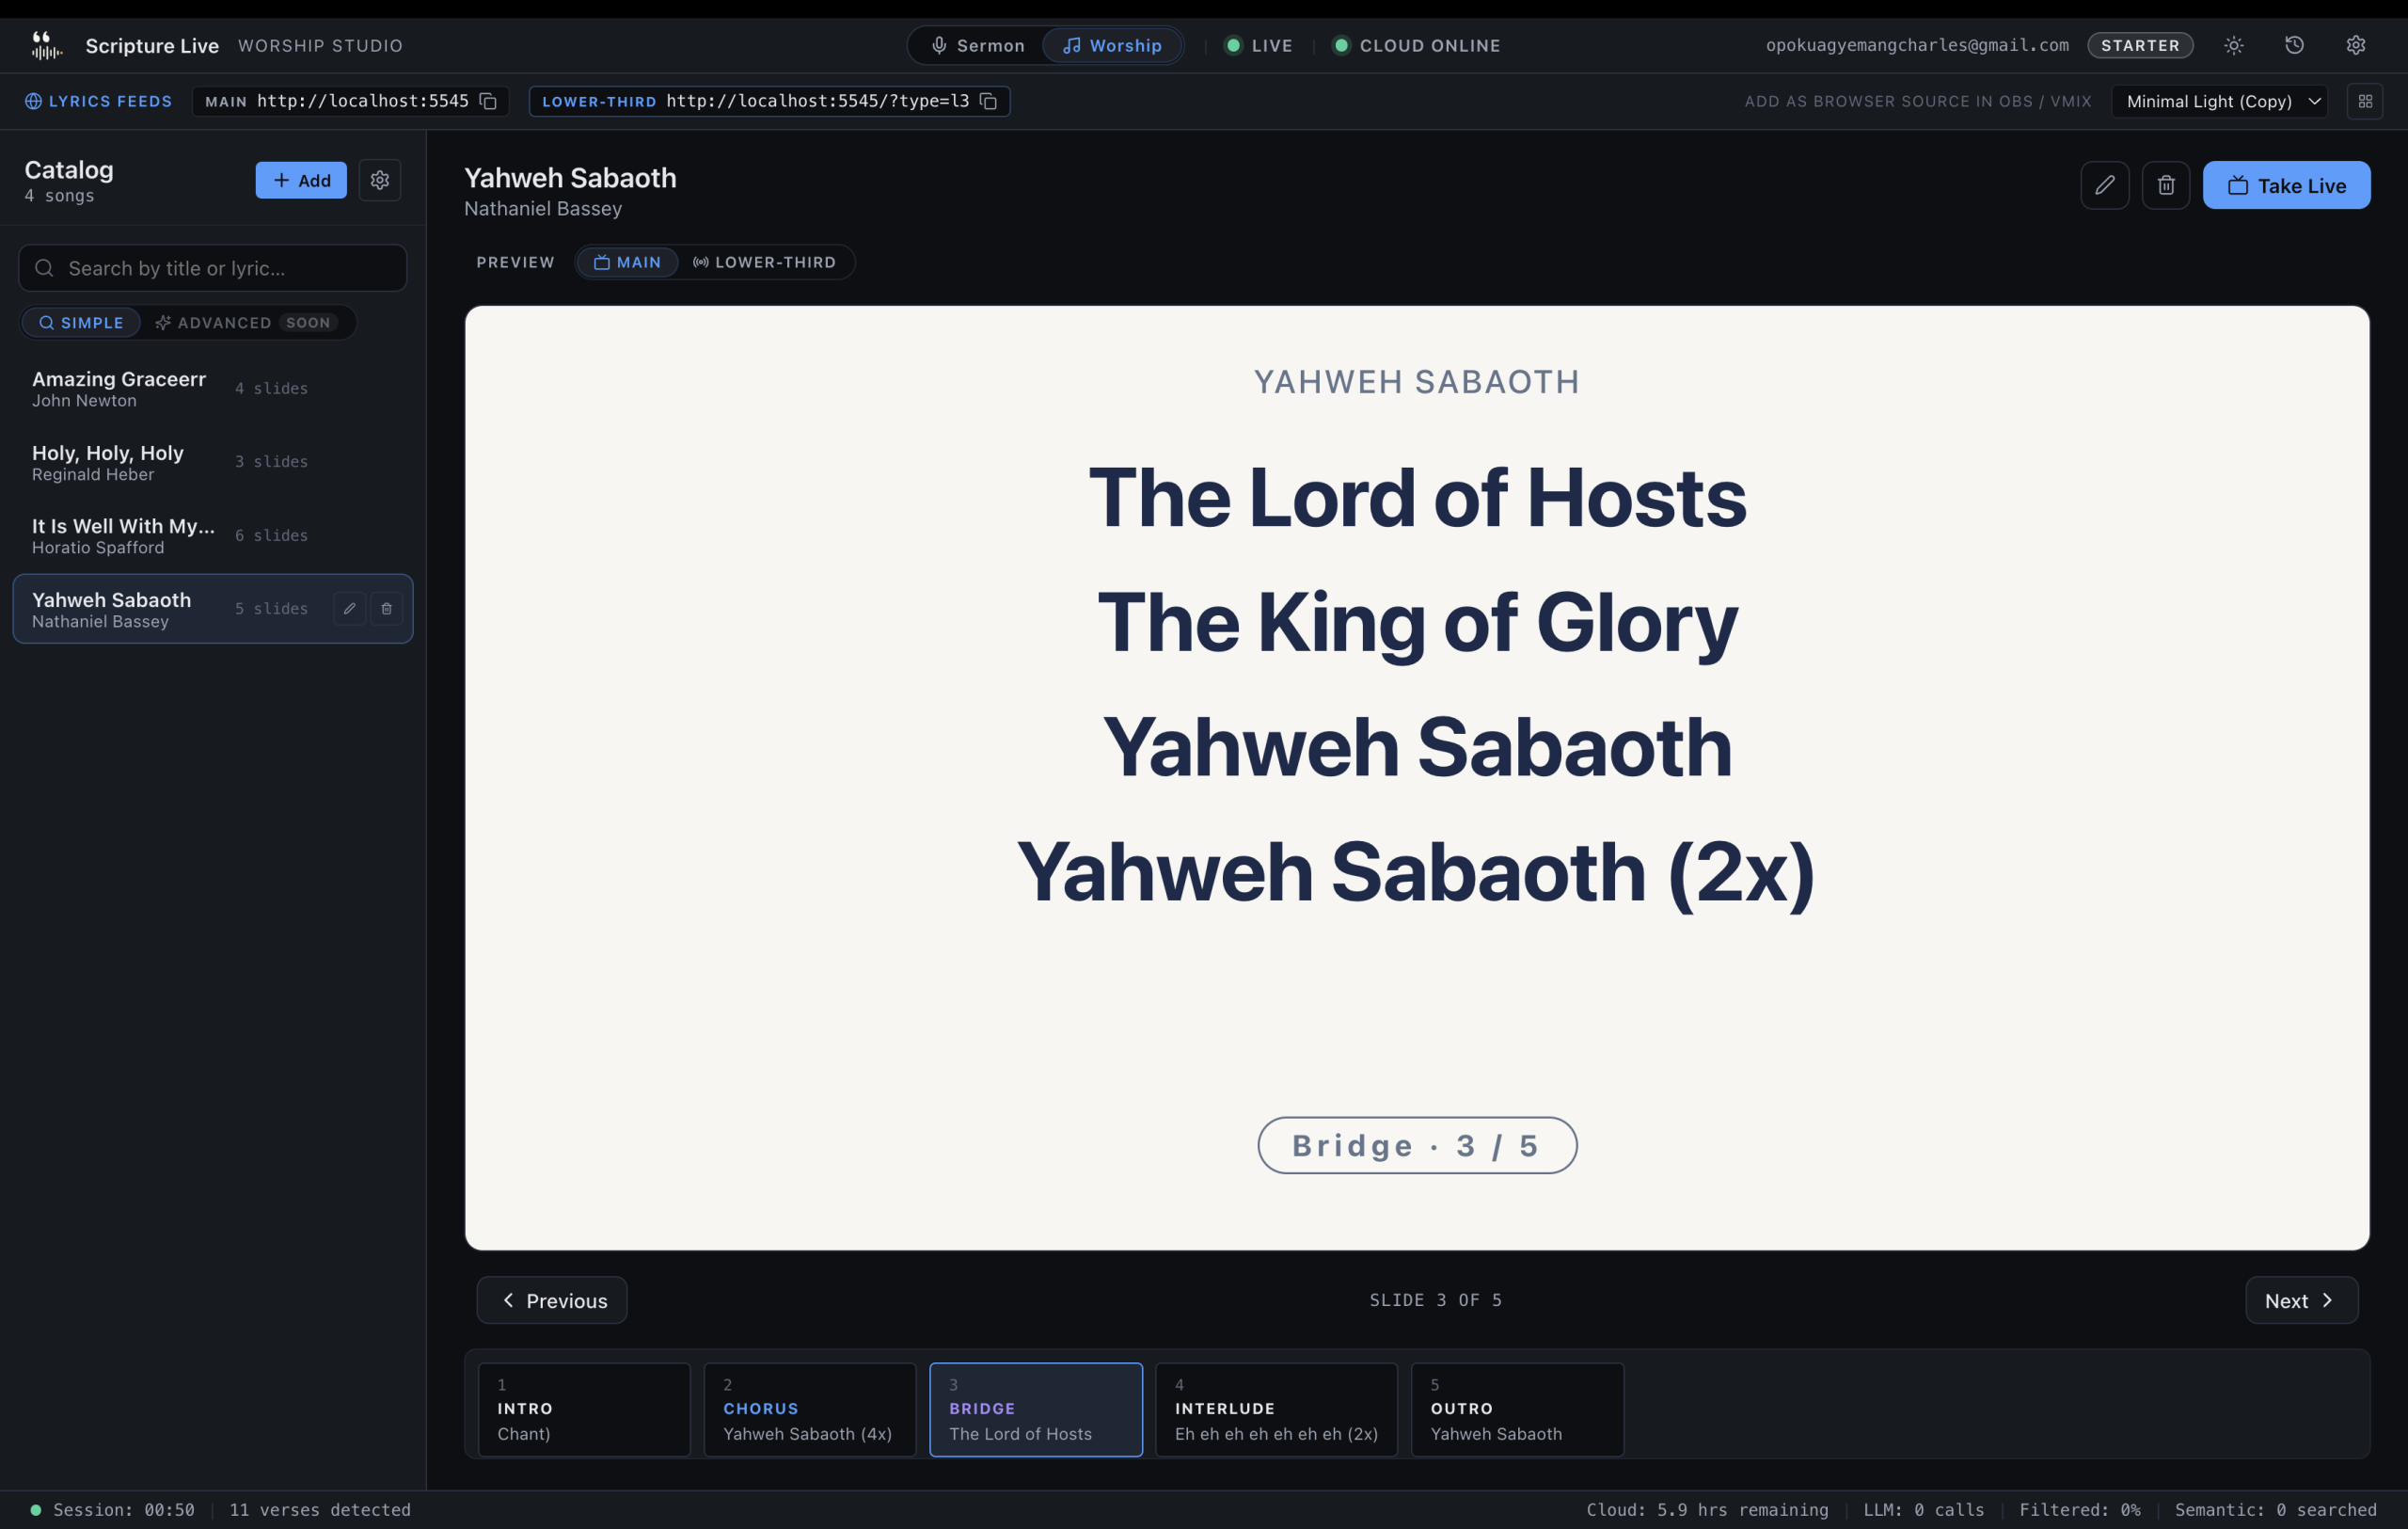
Scripture Live (free Offline Mode; paid tiers from GHS 200/month). Drives both the in-room projector and the OBS overlay feeds. Handles scripture detection from sermon audio if you’re on a paid tier; handles reference search, phrase search, and custom slides on the free tier. Download at scripturelive.app.
That’s it. No third app needed. The two-feed architecture means Scripture Live drives the projector via its Display picker output and simultaneously serves OBS via local browser-source feeds. We covered the OBS side in detail in the OBS browser-source guide, and the broader case for the platform is in the case for Scripture Live.
If you also need video playback (sermon bumpers, baptism reels, offering videos), you can add ProPresenter alongside Scripture Live. We compared the two products here. Most smaller churches don’t need both.
Wiring it up
The order matters. Set things up in this sequence and you’ll save yourself a lot of debugging.
1. Streaming PC first
Set up the Mac Mini or Windows mini-PC in the booth. Install:
- OBS Studio (download from obsproject.com)
- Scripture Live (download from scripturelive.app)
Boot, sign in to OBS with your YouTube or Facebook streaming key, sign in to Scripture Live if you have a paid license (or skip and use the free tier). Confirm both apps launch cleanly.
2. Audio second
Plug the microphone into the audio interface. Plug the audio interface into the streaming PC via USB. In Scripture Live’s Settings → Audio Source, pick the audio interface as the input. In OBS’s Audio Settings, also pick the audio interface as one of the audio inputs.
Now both the streaming pipeline and the detection pipeline can hear the pastor.
Talk into the mic. Confirm Scripture Live’s transcript pane fills (if on a paid tier with detection) or at least that OBS’s audio meter moves.
3. Projector third
Plug the projector into the streaming PC via HDMI. Wait for the OS to recognise it as a second display.
In Scripture Live, click Output in the top bar and pick the projector. The borderless verse window should appear on the projector. Confirm by triggering a reference search — type John 3:16, hit display, watch the verse appear on the projector.
4. Camera fourth
Plug the webcam (USB) or capture card (HDMI-to-USB) into the streaming PC. In OBS, add a new source: Video Capture Device, pick the camera. Resize to fit the canvas.
5. OBS scenes fifth
Build out the scenes. At minimum:
- Pre-Service Loop — a static graphic or slow loop. No live audio.
- Worship — camera feed plus the lyrics browser source (
http://localhost:5545?transparent=true) as a lower-third. - Sermon — camera feed plus the scripture browser source (
http://localhost:5544?transparent=true) as a lower-third or full-screen overlay depending on aesthetic. - Outro — a static graphic with closing music.
Set audio routing so the pastor mic is live in the Worship and Sermon scenes.
For each scene, add the relevant Scripture Live browser source as documented in the OBS browser-source guide. Width 1920, height 1080, transparent mode for overlay use.
6. Test
Trigger a verse in Scripture Live. Confirm it appears on the in-room projector AND in the OBS preview of the Sermon scene. If both update, the architecture is wired correctly.
Pre-service rehearsal checklist
Don’t trust a system you haven’t rehearsed. Run a full end-to-end rehearsal at least once before the first live service. Then keep a printed checklist in the booth and run through it before every service.
- [ ] Streaming PC powered on, OBS and Scripture Live launched.
- [ ] Audio interface powered on; pastor mic plugged in and tested at the actual service volume.
- [ ] Projector powered on; output assigned via Scripture Live’s Display picker.
- [ ] Translation in Scripture Live set to whatever the pastor is preaching from.
- [ ] OBS streaming key valid; click Start Streaming in test mode (not live) and confirm OBS connects without errors.
- [ ] Each scene tested in OBS preview — camera live, audio meter moving, scripture/lyrics browser sources updating.
- [ ] Trigger a sample verse via Scripture Live’s Reference Search — confirm it appears on the in-room projector AND in OBS.
- [ ] Trigger a sample worship lyric — confirm same.
- [ ] Confirm internet bandwidth — at minimum 5 Mbps upload for 1080p streaming, ideally 10+. Run a speed test from the streaming PC.
- [ ] Operator has the service running order printed or on a second screen, with reference cues marked.
- [ ] Hit Start Listening in Scripture Live (paid tier) two minutes before service begins.
- [ ] Click Start Streaming in OBS one minute before service begins.
If any item on this list fails, fix it before you go live. Don’t ship a half-broken stream.
The operator’s role during service
Where do they sit? In the booth, behind the streaming PC. Headphones on, listening to the pastor through the OBS audio bus or the in-room sound system.
What do they watch? A 24-inch monitor with three things visible:
- Scripture Live’s operator window — transcript pane on the left, detection queue in the middle, manual search bar at the top.
- OBS’s preview window — to confirm what’s actually being broadcast.
- Optional: a feed back of the live stream — a phone or second tab showing the YouTube/Facebook broadcast at a 30-second delay, so they can sanity-check the actual viewer experience.
What do they do? In a paid-tier setup with live detection running:
- Watch the suggestion queue. Reasoning Layer suggestions need a one-click confirm; high-confidence Pattern and Semantic Layer hits auto-display.
- Manual search for paraphrases the system misses. Type a phrase, pick a verse.
- Switch translations on demand when the pastor pivots.
- Cue worship lyrics and custom slides at the right moments.
- Switch OBS scenes when the service moves between segments (worship → sermon → communion → outro).
- Hit Pause / Resume on the listener between segments.
How do they fail gracefully? If the internet drops, detection pauses but the in-room projector keeps showing whatever’s currently up. The operator falls back to manual reference search. The OBS browser-source feed continues working from local data. The stream may degrade or pause depending on the broadcast software’s reconnection behaviour.
If something fails on stage — wrong verse displayed, a slide that shouldn’t be live — there’s a Clear button in Scripture Live’s operator window that takes everything off screen. Use it. Black is better than wrong.
Common mistakes new tech leads make
We’ve watched a lot of churches do this for the first time. Here are the mistakes that come up over and over.
- Typing references manually instead of using detection. A paid-tier user who keeps typing references during the sermon is wasting the subscription. Trust the pipeline; intervene only when it misses.
- Forgetting to start the listener. Detection only fires when Start Listening is clicked. If the transcript pane is empty during the sermon, that’s almost always why.
- Not assigning the projector output before service. The Display picker has to be set per launch. Bake it into the rehearsal checklist.
- OBS scene not linked to the right browser source. Scripture appears on the worship scene; lyrics on the sermon scene. Per-scene routing is the whole point of the two-feed architecture.
- Not testing the stream end-to-end. The first time the stream goes live should not be the first time you’ve tested it. Run a private rehearsal stream.
- Mic not set as the OBS audio source. OBS captures audio from whatever device you’ve configured. If you’ve left it on the PC’s built-in mic, the broadcast will be silent or pick up booth noise instead of the pastor.
- Underbuilt internet upload bandwidth. 1080p streaming needs at least 5 Mbps up. Confirm with a speed test from the booth, not from a phone in a different room.
- No backup audio. If the wireless mic fails mid-sermon, what’s the fallback? A wired mic plugged into the same audio interface, on standby, is cheap insurance.
A shape of the budget
Rough numbers, mid-range, in GHS, for a church starting from scratch with nothing.
- Mini-PC streaming machine: GHS 10,000
- 1080p projector: GHS 4,000
- USB audio interface: GHS 1,500
- USB or wireless mic: GHS 1,000
- 4K USB webcam: GHS 1,500
- Cables, stands, mounts: GHS 1,500
- Software: free for the first month (Scripture Live’s free tier + OBS), then GHS 200/month for Scripture Live’s Starter tier when you’re ready
Total hardware: around GHS 19,500. Total ongoing software: GHS 200/month.
You can do it for less by reusing existing equipment (a laptop instead of a mini-PC, an existing projector, a borrowed mic). You can do it for more with proper cameras, a switcher, and a multi-camera setup. The numbers above are the “good enough for most churches” baseline.
FAQ
Q: Do I need a separate machine for streaming and for projection?
No. One machine handles both. OBS and Scripture Live run on the same streaming PC, with the in-room projector as a second display.
Q: What internet speed do I need for streaming?
Minimum 5 Mbps upload for stable 1080p. 10 Mbps recommended. Test from the booth before the first live service.
Q: Can I use a phone as the camera?
Technically yes, via OBS Camera or similar. Quality is acceptable for a small church. We’d recommend a USB webcam or a real camcorder for anything bigger than a 50-person room.
Q: Do I have to pay for Scripture Live to run the live stream overlays?
No. The browser-source feeds (localhost:5544 for scripture, localhost:5545 for lyrics) work in the free Offline Mode. The paid features unlock live detection from sermon audio.
Q: What if I’ve never used OBS before?
The OBS docs and YouTube tutorials are excellent. Plan a Saturday afternoon to set up the scenes and run a private test stream before going live.
Get started
Setting up a church projector for live streaming is mostly a sequencing problem. Get the streaming PC and software running first, audio second, projector third, camera fourth, and OBS scenes last. Download Scripture Live on the streaming PC, set the projector output, and add the browser-source feeds to your OBS scenes. The whole stack is at https://scripturelive.app.
Related reading
Try Scripture Live
Free Offline Mode includes the KJV and Twi Bibles, reference and phrase search, custom slides, and the OBS browser-source feed — install on as many machines as you want, no account needed.
📥 Download: scripturelive.app
💵 Pricing: scripturelive.app/pricing


Leave a Reply